Proper care, inspection crucial for needle holder performance

Most procedures begin with a scissor and end with a needle holder. To surgeons, the first impression of surgical set quality is the scissor’s sharpness and their final perception is the needle holder’s ability to hold the needle to close the incision. Needle holders, sometimes called needle drivers, are indeed the “heroes” of the incision closure.
There are many different types of needle holders for various procedures, but all have the same basic parts. Typically, they are constructed of stainless steel and have stainless steel jaws or tungsten carbide jaw inserts (indicated by gold-colored rings). Tungsten carbide jaws can be replaced without replacing the entire instrument. The gold color on the needle holder rings indicates the jaws contain tungsten carbide. This gold color is only a visual identifier of the presence of tungsten carbide construction and does not affect the use of the instrument. Tungsten carbide is much harder than stainless steel and wears out more slowly, and tungsten carbide jaws can be replaced when they do wear out. The jaws of non-gold needle holders are made of stainless steel. The jaws of stainless-steel needle holders are not repairable. Once the jaws wear out, the entire instrument needs to be replaced.
There is a common misconception that tungsten carbide-jawed needle holders cannot be placed into an ultrasonic cleaner because the jaws will pop out of the instrument during cleaning. Although there is a possibility that the jaws will come off inside an ultrasonic cleaner, they can still be reattached. The machine itself will not damage the needle holder. If a jaw does pop off, it is most likely in need of repair. Having a jaw pop off during cleaning is much better than having a jaw pop off during a surgery.
Some needle holders are blue in color. A blue needle holder indicates the instrument is made of titanium. Titanium is typically gray in color, but these instruments are anodized to achieve their color. This process also makes the instruments non-reflective, which reduces glare from operating lights. Titanium needle holders are much lighter than stainless steel, which can reduce hand fatigue during long surgical procedures. They are also non-magnetic, rust-proof, and stronger than stainless steel. These properties make titanium instruments more expensive.
Smooth jaw needle holders are for holding extremely fine suturing needles. They can have diamond dusted jaws or ceramic jaws. A diamond-dusted jaw is indicated by black-handled rings. These needle holders have a fine dusting of tungsten carbide applied to the jaws using an electrical applicator with a carbide electrode. Green-handled needle holders have ceramic jaws.
As with all surgical instruments, it is imperative that needle holders be inspected daily for wear. An important part of every Sterile Processing (SP) professional’s job is to ensure a quality system is in place for all surgical instruments to be in top condition prior to their arrival on the sterile field.
Testing inspection points
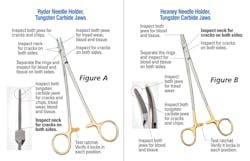
In addition to regularly scheduled inspection and maintenance, SP professionals should inspect all needle holder jaws before placing them in the surgical tray. A quick inspection technique is simply to separate the rings and inspect both jaws. All jaws wear out over time. If the needle holder’s jaw is chipped or worn upon inspection, it should be immediately removed from service to be repaired or replaced.
Cracks in the neck of the needle holder are another common problem. Inspect the neck of the instrument on both sides for cracks (see bold section in figures A and B). Cracks occur when a small needle holder is used to hold a larger needle. Another reason this may occur is when a needle-nosed pliers is not included in an orthopedic set; needle holders are then used like pliers to pull pins and twist wire. This is not a recommended use for needle holders. These cracks are not repairable. Instruments should be removed from service immediately and discarded.
Another essential part of needle holder inspection is ensuring the ratchet locks in each position. To test, click each ratchet slowly to see if the needle holder firmly engages. If it does not, put the needle holder on the first ratchet and gently tap it on a flat work surface (not the palm of your hand). If the ratchet holds after three or four taps, flip the instrument over and repeat the test. If the ratchet springs open during either test, the instrument should be sent out for repair.
Certain portions of this article were originally presented in the Sept./Oct. 2019 issue of PROCESS from IAHCSMM and this article is reprinted with permission.
About the Author

Rick Shultz
Rick Schultz is an author, inventor and lecturer, and the retired CEO of Spectrum Surgical Instruments Corp.